Sunday, July 5, 2015

Recently Completed Legend Heading North

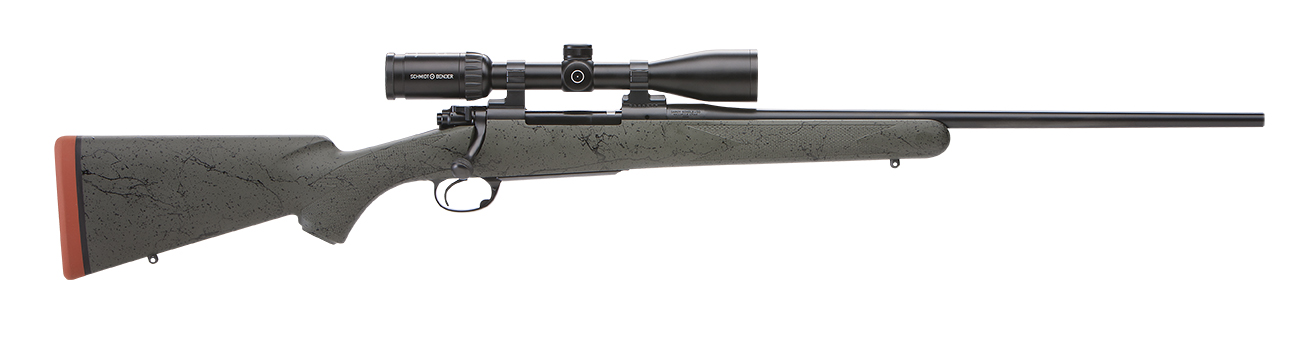
The recently completed Legend pictured below will soon be on its way into the British Colombian wilderness. The owner hopes to use this 270 Winchester to take a coveted Stone Sheep Ram and perhaps a Moose if the opportunity arises. The rifle is fit with a light weight 22" Krieger C/M barrel with all the external hardware made from steel. The completed rifle balances very well between your hands and at 8-lb's 5-oz's is light enough for any extreme mountain hunt and heavy enough to allow the shooter to settle in and place a precise shot at extended ranges from a sitting or prone position when required.


I am really beginning to warm up to the S&B Summit Scope and it may now be my favorite 1" scope for all around hunting situations. I have been very impressed with the clarity of the scope but more importantly impressed with the mechanical integrity of the scope and the generous eye relief. While I do know of one Summit having given a client some issues, knock on wood, so far I have had experienced only excellent performance while testing Summits at the range. I will be putting one through the ringer soon on a rifle of my own. If I could change anything it would be to modify the 8A reticle so it would duplicate the typical American Duplex. I have long since given up trying to understand reticle design featured on European manufactured scopes.


This Legend shoots extremely well with a 140gr TSX hand-load and will no doubt be "enough" bullet for any BC Moose if the owner places the bullet into the bread basket. I would feel well equipped with this rifle as I sat among the lichen covered rocks, elbows resting on my knees as I scanned the basins around me for the telltale sign of the off white rumps of feeding rams.

Photo's by Kevin Dilley-Klik Photography

Thursday, June 25, 2015

An 8 Bore Mortimer gets a face lift

I was recently contacted by Stephen Alexander, the restoration and gun smithing talent for Lewis Drake and Associates (www.drake.net). Without a doubt Steve is one of the most talented gunsmiths that I have had the pleasure of knowing. He called to inquire into my work load to schedule some pantograph  time for a project he had at hand. I always enjoy getting projects from Steve as you just never know what will show up. Typically he supplies an original stock to use as a pattern but I've had a few patterns show up made from standard construction grade 2x4's glued together with the Head End glassed for a particular receiver with Bondo or some similar epoxy and nothing more. No butt, no comb, no grip just a glassed impression of the receiver, lock work and trigger plate on a plank. At first glance to the novice this would appear quite non professional. This couldn't be further from the truth. Steve's methods are direct and extremely simple, with no time is wasted on pattern construction.

What showed up this time was an 8 Bore double flintlock rifle stock made by H.W, Mortimer and assembled sometime in the 1800's. The stock resembled a jungle dugout. With it's massive side by side barrel channels, lock panels, straight grip, steel butt plate, and patch box cavities it is a relic from the days in India when men hunted on the backs of Elephants.

What he had failed to emphasise was the French Walnut blank to be turned was the very same width as the pattern. Not  sort of close, but the very same width as the two apposing lock plate panels! Normally you hope for a 1/4" of an inch of extra wood per side. In this case I had nothing extra, zero, zip, nada. I called Steve and asked if he had a thicker blank we could use. "Nope that's the one we have to use, should be a piece of cake for you" was his reply. I think I heard him laughing as he hung up the phone. I was trying to think as to how I had just gotten so lucky as not only was the blank the same width, but also wracked and had a 1/16" bow in it. No problem !


The challenge now was the exact placement of the head and tail stock centers on the pattern and the blank so the lock area on both sides of the stock would wind up with an equal amount of wood on either side as I had ZERO width to spare. This was accomplished by moving the location of the centers and placing the stock blank back in the machine many times before I felt I had the center of the blank centered with the pattern. At one point I walked outside to consider a new profession. 

This aspect of the job took hours before I was ready to begin the machining process. The width of the fore-end that supported these massive barrels was so wide that I could not use both my rotary steady rest. Only the rear rest could be employed. Note to self: remove the Alexanders from the Christmas card list. 


Then the French walnut blank was machined to within +.125 of the original stock profile to remove most of the excess wood. The over sized stock was then removed from the machine and allowed to hang for 48 hours to warp, bend or twist. This means of stabilization is one of the main reasons I prefer stocking with a pantograph. If the stock is going to walk around it will do it now in the pre machined state before the final inletting or shaping has begun. Its pretty hard to dispute that a blank can sometimes radically move if you have a large enough truly flat surface, a pair of 123 blocks and some indicators. While the stock shown below is for a magazine rifle the means of measurement holds true for any stock. You don't believe me, I've never known an indicators to lie. The worst movement I've ever detected was almost 1/8" on a straight grip shotgun blank during this phase. 


Then the Mortimer stock was placed back in the Hoenig and a rotary steady rest was attached and independently zeroed on the pattern and the walnut blank. Once both the stock and pattern were as vibration free as possible the final inletting was begun by using progressively smaller stylist for what ever cutter was required. The sensitivity and accuracy of good machine is amazing but you need to be on your toes at all times while running one. While a precision machine is nice you also need to have a well prepared pattern that lacks any voids, issues or problems, sharp cutters with matched stylist and then an operator that has more than a few hours at the helm. Lack one of these and the finished job might not be in showroom condition when finished. Not all wood cuts the same, with some blanks being real nightmares to machine to prevent wood chips the size of match heads from flying off into space. Some stocks are wonderful to cut while others will make you want to leave the shop early that day. 


Once all the inletting is completed the OD of the stock is machined to within +.030 of the original patterns surface with the steady rest still in place. As with the inletting the rotary rest will dampen the vibration, flex and cutter bounce to insure a smooth exterior surface on the walnut. Lastly the steady rest is removed and the minimal area of exterior wood under the steady rest is now machined to match the final surface of the stock. Laps time to set up and complete the machine work for this stock was 10 hours. And yes the stock was correctly positioned and cut dead center within the narrow blank. Once again proving that skill and daring can overcome fear and uncertainty, at least some of the time. 

Steve tells me the inlet went great and the finish work is coming along nicely. I'll post a pic of this beast when Steve has one available. 


Wednesday, June 10, 2015

The Eastern Cape

Ben Skinner just returned from the Eastern Cape of South Africa having spent the last 7 days with Professional Hunter John Oosthuizen of Hunters and Guides (hunters@huntersandguides.co.za). This was Ben's first trip overseas to hunt and like most of my clientele he went well prepared and fueled with enthusiasm. Hunters and Guides had arranged for Ben to hunt out of the Lukhanyo Lodge Reserve not far from Grahamstown. While rain hampered the first and second day of his hunt they made up for lost time for the remainder of his trip.

Ben carried a Legend he has hunted with for 15 years that is chambered for 300 Winchester Magnum and loaded with 180gr Nosler AccuBond bullets. When given the opportunity he did his best to make his shots count. He did have a few closing comments as he pulled into his driveway to reunite with his wife and kids "The trip was much more enjoyable that I had ever expected it would be, John, Chris and the team were just amazing to be with" and "the Legend as always, worked flawlessly"

The hunt was over way to soon and he left the Cape with a hat full memories and an appreciation for the hunters, trackers and game he encountered while under the Southern Cross. Congratulations Ben


Monday, June 8, 2015

Snake Bit

It was easy to tell the that all was not well by the tone of voice on the other end of the line. It would seem that a 7mm Bore Snake was stuck vault tight inside the barrel of a 7mm Legend. A kink in the Snake was observed making the corner at the ejection port as the cord was being pull through the muzzle. When the kink slipped into the chamber the Snake came to an abrupt halt.

Undeterred the owner now applied more tension on the cord hanging out of the muzzle, nothing moved. Things now get a bit vague and I'm not exactly sure just what happened over the next couple hours. An accomplice to this event graciously offered assistance, 4 hands came into play, I think a come-along was suggested and perhaps a mule got involved. At some point in the struggle the forward end of the Snake parted just behind the bronze brush section of the Snake. Now no sign of the Snake was visible from the muzzle end, and a flashlight revealed just a faint vestige of the Snake in the chamber. Things had just gone South.

The team re-grouped, put their heads together again and devised a plan that apparently involved a wooden dowel and a screw mounted on the dowel that was inserted through the receiver and into the chamber end of the barrel in a last ditch attempt to snag the Snake. I think some alcohol was involved but I can't confirm this.

It was after the last attempt that I got the first phone call. The rifle was eventually packaged up and sent my way. This gave me time to think about a solution to this problem, I admit the options looked pretty bleak.

Now I personally like the Bore Snake for keeping the chamber and barrel clean on my hunts. If hunting in particularly bad weather I will generally pull the Snake through the bore before I start the day and after I return at dark no matter how tired I am. Like my knife, it's part of my field gear and I have yet to have one jam in the bore. Was the kink in the cord the contributing factor? was it the correct caliber Snake used to begin with ? While waiting for the rifle to arrive I began to experiment with different solvents that might aid in breaking down the nylon fibers on a spare Snake I had in the shop. Of the 5 liquids I tried only Lacquer Thinner seemed to make the nylon fibers at least more supple and slippery. The Net didn't offer up any incite worth bookmarking. This was going to be interesting to say the least.

The rifle arrived and the barrel removed from the receiver. The breech end of the Snake could be seen in the neck section of the chamber. The chamber was too narrow for pliers, hemostats, or any other tool I might have at my disposal to reach the end of the snake. I decided to pour some lacquer thinner in the chamber end as the barrel stood vertical in my trash can. Frankly I was at a loss as to what to do next other than fit a flat brass jag to a Dewey rod and give the Lacquer soaked Snake a push from the muzzle end. Nothing Moved, the Snake was dug in like a tick.

While at lunch I mentioned the situation to my wife as she was building a sandwich and she suggested an idea that I immediately turned 180 degrees to form a different approach from her original idea. I never finished lunch, I headed straight back to the shop. I located a 12" piece of 3/16" O-1 Drill Rod, chucked it up in the lathe and turned an ogive shape onto the end of the O-1 rod. I polished the ogive section of the O-1 with fine Wet or Dry paper, hit it with some Scotch-Brite and then heated the ogive area of the rod to a dull red color with my torch. As gently and as accurately as I could I pushed the red hot rod into the center of the nylon Snake visible in the chamber neck. The rod melted into the nylon about a 1/4 " before coming to a halt. I let the rod cool for about 10 minutes and then gently pulled on the O-1 rod. Out slid the Bore Snake just easy as you please. The nylon had indeed fused itself to the red hot end of the O-1 as I had hoped.


Perhaps the displacement of the fibers via the heat transfer had eliminated or reduced the size of the kink, perhaps the Lacquer thinner lubricated the Snake enough to reduce the friction in the bore even  more. I will never really know completely.


Feeling like I just snatched this disaster from the jaws of death I cleaned the barrel to insure all the  nylon residue was removed from the chamber and throat area before screwing the barrel back into the receiver. Then to further confirm that all was "happy Christmas" I dug out the Bore Scope to visually inspect and confirm the barrel was clear and ready to test fire.

What I saw next through the lens of the Bore Scope curled my toes. The entire shoulder, neck and lead area of the chamber was trashed beyond any repair from the attempt to retrieve the Snake with the wooden dowel and wood screw. There was nothing at this stage that was going to save this barrel to shoot another day. Unfortunate as this barrel had only been shot enough to work up a good accurate TTSX load just before the incident.

Time of death was called at 5:17 pm. Saturday afternoon.

Sometimes even your best attempts are just not enough.


Saturday, April 25, 2015

Shipping 101


Over the years I have witnessed a number of unfortunate shipping disasters. Not to long ago I picked up what had once been a much better than average Pre-64, 375 H&H Super Grade from my Post Office. The case used to ship the rifle may have cost $30.00 at a big box store. The thin cardboard sleeve covering the case offered nothing in the way of added protection. When I signed for the package with my Post Master a casual look over the exterior of the box showed no visual signs of trauma. Every time I receive one of these cases containing a high grade rifle I feel as if I have just run into a mine-field. When I opened the case back at the shop my heart sank. A crime had been committed, the wrong case had once again been used for shipping! The phone call to the owner started out something like this " time of death for your Super Grade was 9:46 am ".


The owner, a great client and friend, had removed the bolt from this rifle, wrapped it in one layer of bubble wrap and placed the bolt body under the barrel ahead of the fore-end tip then closed and taped the latches shut. He slipped the plastic case into a cardboard sleeve and dropped the rifle off with his postmaster on his way to his son Lacrosse practice. The trip across the country must have been pretty rough. During that trip the bolt body had migrated out of the bubble wrap then back and forth from the trigger guard bow to the muzzle. The dents and dings in the barrel and fore-end while repairable required significant cost for these repairs. The Redfield receiver sight which had been in excellent condition before the trip now was bent beyond any chance of repair. The rifle itself was now positioned in one corner of the case and in contact with the hinge side of the case and not located anywhere the center of the case. Further proof the that the rifle was migrating on a quest of its own inside the case during it's travels west. To add insult to injury the package was not insured.

Over the years I have used and have received a serious selection of gun cases. Aluminum, molded plastic, fiberglass, regular cardboard boxes with and without foam centers, triangles, cardboard tubes you name it, I've seen it. As with many things in life generally the more money you spend on a case the greater the degree of protection you can expect. The heavier the case, the more you'll pay for shipping cost but the money spent for this protection is well worth the investment on the front end. I have used a variety of Aluminum cases over the years, some designs are excellent and can withstand a lot of abuse while keeping the contents secure. However I have had rifles shift in transit encased in aluminum and had both the recoil pad or muzzle damaged created on sharp inside edges of the case left over from the manufacture process. Once again not all cases are created equally despite the cost outlay.

I have sadly received more big box cases than any other model design. These molded plastic case are cheap and can be found almost anywhere. They typically come with an egg carton foam liner that is 1" thick per side but with the egg shell pattern the bottom of the cavities only offer on average a 1/2" of thickness. When these Big Box cases are purchased a cardboard sleeve is usually not included in the sale. I consider the best use of these type of cases is for going to your rifle range and traveling to a hunting area in or out of state in your personal vehicle. While this style case is used for shipping firearms across the country everyday by all the major carriers you are taking on a significant risk in using this type of case for interstate transportation. I would NEVER fly with one of these cases to any hunting destination.

If you insist on using one of these thin cheaply molded plastic cases to ship a rifle or shotgun it is best to roll up and tape linear sections of bubble wrap and lay these along the sides the firearm to help prevent the firearm from migrating in the case during transport. Wrap the bolt body in bubble wrap and surround the bolt body with these linear pads to prevent the bolt from coming in contact with the rifle.


Failure to do so is just asking for disaster.  Do what ever it takes to find a cardboard sleeve that allows for a minimum of  2" of padding on either side of the Big Box case as well as on either end. If you have less than 2" of additional padding around the Big Box case GOOD LUCK in claiming any insurance from the carrier. Typically your cardboard sleeve will need to be 54" to 56" in length. Then fill the cavity between the gun case and the sleeve with packing peanuts, really fill it, pack it, cram it and jam it so the plastic case can not shift, move and rattle during transit. I have used this method many times in the past to ship Legends, never a Classic. As of Jan 2015 I will never ship another Legend even re-enforced in a Big Box case and cardboard sleeve as the stakes have just gotten to high.

I mentioned aluminum cases, most of these cases protect a firearm very well. They are a quantum leap forward in protecting your firearm while shipping firearms across the state or country and certainly for air travel. Full length hinges are a good thing with these aluminum cases, look for them. Locking bars are another options as are retracting or flush mounted latches. Before you buy, open the case and feel under the edges of the foam inserts, are the edges under the foam sharp and ragged ? If the cases is tossed by baggage handlers and the firearm slips under the foam and up against any sharp edges you might have problems, I have seen this happen more than once. Unless your traveling to a hunting destination using a cardboard sleeve slid over the aluminum case is also a good idea. I'd rather have a potential thief have to ponder whats is in the sleeve than knowing he has a firearm right off by all the travel stickers and pro-gun propaganda logos plastered on the sides of an un-sleeved case. The cardboard sleeve will only apply for carrier shipping. Air travel of course requires easy visual access to the firearms for TSA and custom agents.

Bar none the best cases I have used to date have been the Pelican 1750 and the Storm-Case im3300. I prefer to ship every Classic or Legends that leaves the shop today in one of these cases. These two cases come with three separate solid layers of foam.
If this style case is to be devoted to a particular rifle then the center section sleeve of foam can be cut to fit that rifle and scope further preventing the rifle to migrate in the case during the transit. The cut outs can be done so the bolt is removed from the rifle or installed in the rifle, cavities can be cut for small tool containers as well. Done properly the protection allowed in this type of case to the firearm is excellent. You can also invest in additional middle foam sleeves cut for different rifles to extend the use of this style case. One case and two extra sleeves can cover a lot of hunting around the world.


The Storm and Pelican cases are not expensive when compared to the protection they provide. I buy the 1750 Pelican case locally from a dealer that knows I will not pay for the case unless the cardboard sleeve comes intact with the new case. When I ship a rifle back to the client I advise them to save and store the sleeve in case the rifle ever needs to be returned for cleaning or maintenance.

Choice of carrier depends a lot on your location. I continue to use UPS, FED-EX and to a minor degree the US Postal System for all my shipments. Knock on wood, I have very, very few shipping issues over the last 30 plus years when I have shipped a firearm from this shop. However as stated in the beginning of this text incoming parcels have not always arrived in good nick. I can say that anytime I have had a problem the support to resolve the issue by both UPS as well as FED-EX has been very professional. With the exception of my local Postmasters dealing with USPS can be interesting to say the least.

You can get two scoped bolt action Sporters into one 1750 or im3300 but you will most definitely have to cut a cavity into the center foam section when flying to any destination. Even with weight restrictions today concerning air travel you are still only touching about 31 to 32 pounds with a single scoped rifle and approximately 10 more pounds with two scoped rifles in one of these cases.

If the unfortunate does happen and a firearm is damaged while in transit the "step and fetch" procedure to rectify the matter is not for the faint hearted or those with a limited amount of patience. The claim must be handled by the original shipper and not the recipient. Documentation of the shipment and any insurance coverage must be produced, pictures of the damage along with inspection by an agent representing the carrier will need to be carried out. The rotation of the earth will seem to stop as the wheels of compensation are considered by the insurance and shipping carrier. It is a slow painful death that can be avoided with the right case and some up-front expense.

The next time you get set to ship a firearm for any reason, sale, repair or for a hunt you might want to give some serious thought to the "what ifs" before you reach for that old $30 Big Box special with the broken hinge and the Scotch Tape.

Wednesday, March 4, 2015

Revisiting My Scope Ring Alignment Tools


This product was recently mentioned in John Barsness's newest book, Modern Hunting Optics that was reviewed on this Blog and I felt this was a good time to revisited the subject.

More often than not I am required to develop a tool for my own use and sometimes find others just might benefit from the same tool or fixture. This is the tale of such a tool. Both these 1" and 30 mm alignment tools are made from precision ground steel round stock. Rigidity is the name of the game here.

These 1"and 30 mm alignment tools were originally developed for the specific task of aligning both the front and rear scope rings that I install on the given receiver after the fabrication of these rings. The ID of both the front and rear ring is bored to the specific scope diameter + .001 They also serve to re-align the finished scope mounts whenever they were removed and or re-installed on that receiver.


Since my ring and base are integral I wanted a way tighten the base screws to the action and keep the rings in alignment. These tools allow access to both the front and rear sets of scope base screws. As the screws are tightened down the tool aligns the front and rear mounts in the same plane as the screws are drawn up tight. Even with a precision fit set of rings made to exacting tolerances I wanted a simple way to prevent one ring from possibly leaning to the right and the other to the left or twisting under the torque of the screw driver during the installation. These tools have been used in my shop for many years now and shipped to many clients that have both a set of 1" and a set of 30 mm rings for a singular rifle. Having both the 1" and 30 mm tools allows them to switch out and reinstall either set of rings  simply and accurately when required.

Over the years we also found a number of other scope mounting uses for these tubes that are very practical for the home enthusiast or professional gun smith using both custom and  conventional industry mounts. These tubes like any other bar type tool can be used to rotated the front ring 90 degrees into position and by having the rear ring attached to the tube as well will allow you to snug the rear ring into place with the scope base windage screws. The rigidity of the tube will insure that the rear ring is inline with the front ring and that the scope will not be put under and undue stress laterally.


However this tool and method will not correct any vertical misalignment issues in height between the front and rear ring. It will instantly make obvious the amount of height deferential and allow you to determine if you will want to install a shim under a base to correct the height issue. I recommend always placing the shim under rear base so as to prevent elevation correction in the scope to be compromised.

Once you have installed a set dual dovetail rings and labored over getting both rings in-line with the typical assortment of tools for this job such as using apposing flat or pointed rods placed in each ring to turn the rings into alignment. Then lapped the rings to gain as much contact with the ID of the rings and the scope. The thought of then removing this set up and ruining the fruits of all that labor can cause you certain amount of mental grief. If base arrangement will allow you access to all 4 of the base screw holes. You can remove the lapped rings and bases together and mark the forward edge of each ring and then send the paired rings and bases assembled together to be blued.


This prevents rust from forming over the years in the lapped ID of the ring and yes this does occur even with completely blued rings as seen in the pic below. With lapped but unblued rings this rust occurs at a very rapid rate.


Done in this manner maintains the necessary friction required to hold the rotary dovetail firmly in the base. Every time you rotate ring in and out of a rotary dovetail it degrades the fit on both the male and female contact area of the set. In short the interference fit of both the rings and bases degrades to the point that renders the set up as loose as a goose and keeping the rifles zeroed is like accurately predicting when the Congress and Senate will vote on any issue together.

Here is another example of where this alignment tool also comes into its own. If the set of rings you've installed and invested all this work into allows you access to all the base screws without removing a ring, leave the lapped set of rings assembled and unscrew them from your receiver for future use or to install a higher set of rings for that 56 mm Hubble sized scope you have always wanted. When the time comes to switch the scope back to a 3.5-10x40mm use the alignment tool to reposition both the lapped lower set of front and rear base/ring combination back onto the same rifle. This is simply done by placing each base/ring back on the receiver, drawing up the scope base screws just enough to take any excessive slack out of the screws but still allowing the mount to wiggle around ever so slightly. Place the alignment tool into both bottom ring halves press the tube firmly towards the receiver and snug up each base screw through the tube body and the slots provided.


Some mounts position one or two of the scope base screws actually under a ring, usually the rear ring. This is fairly typical with older style 2 piece Redfield or Leupold windage screw rear mounts or most vertically split mounts system such as the Talley, Warne, etc. In this case you will not benefit from the use of these alignment tools during an installation or re-installation. The tools will work equally well with the Leupold QR and QRW style rings and Weaver or Picatinny style rails and rings as long as the ring placement does to obscure the base screws. Below a set of Talley Aluminum horizontally split rings are being installed using a 1" Alignment tool.


For those that might be interested in acquiring one or both of these tools I keep and quantity of these in stock and can be order directly from the shop by calling 435-755-6842 or from my Web Site at echolsrifles.com. The cost is $112.00 per tool plus the shipping cost. Please note that USPS will always be cheaper.


Monday, February 9, 2015

Modern Hunting Optics by John Barsness

Here is another heads up on a book worth adding to your personal collection. Modern Hunting Optics is filled with a mother load of in-depth information that any novice and experienced hunter will want to read. The practical and technical advise in this book come from an expert that has made a career testing, freezing, submerging, breaking, using and evaluating hunting optics from every major manufacture in the game. As optical technology for the hunter seems to morph every couple of years it is hard for even the seasoned hunter and rifleman to stay on top of what is truly fact and what is current marketing BS. 

I think John has done his best to stay on the cutting edge of this optical maze by ferreting out anything with a lens when it pertains to hunting industry then giving it the critical eye ball. This text does its best to steer the reader towards making the correct choice for their next purchase or how to better utilize what optical equipment they already have. With 20 chapters and 197 pages it is certainly well worth the price of admission. 


Shameless Marketing Alert: My scope base alignment bar was also given a mention as well and its always nice to know that you have an idea and product that makes the grade with others.


This book can be ordered directly from John Barsness at Deep Creek Press, PO Box 579, Townsend Montana, 59644 or by www. RiflesAndRecipes.com.