Tuesday, December 10, 2013

You Just Can't Make This Stuff Up

In my last post I mentioned we had just received a Fisher Barrel Vise. Well, today we actually had to put it to use. We had been shipped a very clean Pre-64 Super Grade 375 H&H to do some minor work to. Unfortunately the rifles bolt came loose in the case and the US Postal Service must have used the gun case as a temporary truck ramp while it was in transit and some serious cosmetic damage occurred. As the barrel needed to be removed Brian went through the normal SOP with our current barrel vise that has been a mainstay in my shop for over 24 years.

Throughout the years we have run into a few barrels that the only way we could remove those barrels was to place the barreled actions in our lathes 3 jaw chuck and by using a parting tool right up against the receiver face cut a groove to the minor thread diameter into the barrel. By doing so this reduced the shoulder tension and allowed the barrels to removed but this method destroys the barrel. Fortunately all those barrels were to be replaced anyway.

The circumstance we faced this morning was quite different, this barrel had to be removed, re-blued and reinstalled. All Brian's attempts did not break the action free from the barrel. He finally threw up his hands and backed away from the task to re-group, an uncommon occurrence I can assure you. What I saw was a perfect time to remove our old vise and set the Fisher in place. This required a trip to town for some additional hardware and the relocation of a mounting hole. In short order the Fisher was in place. The Winchester barrel shank OD was approximately 1.245 and the bushing that Jerry had sent along had an ID of 1.250. I found and placed a .004 thick piece of card stock around the barrel shank, slid the bushing halves over the card stock then transferred the barrel and bushing into the vise. Since the upper jaw is spring loaded the installation of said barrel was painless.

Then I snugged down all four 3/4" bolts that lock down the bushing and barrel. This was done with a socket wrench. My old vise only used two screws to hold down the top vise jaw. The action wrench was then re-installed. I gave the action wrench a smart thud with a dead blow hammer and the action spun free from the barrel. It was just that simple. The vise is now paid for.

                                         Now tell me, who writes these scripts ? 


Friday, December 6, 2013

Jerry Fisher Barrel Vise Arrives

I picked up my new Jerry Fisher barrel vise at the Post Office today and later in the afternoon I opened the box and gave this tool the hairy eyeball. Visually it is apparent the vise was made by a talented machinist. The exterior and interior finish is excellent, the tolerances are tight. A class act in anyones book.

One noticeable feature is the upper jaw of the vise is spring loaded and as you release the tension on the four 3/4" hex nuts

The upper jaw rises approximately .150 away from the lower base jaw. A damn handy feature when you're assembling a newly blued barrel and action as it gives you an ample margin of clearance to install and remove these freshly blued components without requiring a third hand to prevent marring the parts in the procedure.

A selection of aluminum barrel shank bushings are available from Mr. Fisher in a variety of common barrel shank sizes. Or you can make your own from standard 2" Aluminum or Micarta round stock.

The cost of the vise is $575.00 which I think for a one time investment is not expensive at all over the length of ones career. Good tools demand a fair price and are made to last. I have little doubt this vise will be a good addition to the shop.


Sunday, November 17, 2013

458 Lott Legend And The Trijicon RMR06 Sight System

Over the last year we have had a number of inquires in regard to the Trijicon RMR sights and if they could be applied to our rifles? The questions we had seemed to work themselves out and I modified 2 Trijicon RM62 gunsmith bases that we finally acquired after quite a bit of effort to locate. The height of the stocks comb in relation to the height of the sight itself is as important as any other sight system. The Legends stock design and the RMR06 do work well together.

Anders arrived in Utah to hunt Mule Deer as well as have further work done to his Legend Heavy Sporter chambered for 458 Lott. This rifle has been used on one Elephant hunt already where he used both our Peep Sight and a S&B Zenith mounted in a set of our 30-mm rings. He did in fact use both sight systems to take two different Elephants. In short to try them both under field conditions.

One of his latest desires was to install the RMR06 as yet a third option. As we keep detailed records of scope mounts we make for each project I was able to duplicate the same radius that Brian had surface ground on the front ring to the underside of the RMR base, locate and drill the counterbores for the 8x40 screws and then have the base blued and ready for assembly when he stepped off the plane from Sweden. It took longer to drive to the range than it took to zero in the RMR06. He shot approximately 20 rounds to zero and test the system. He plans to use this rifle this winter in Sweden to add some wild boar to the menu for the holidays.


The Union Club In New York City Echols & Company Presentation

Last week I gave a Power Point Presentation to the Union Club In New York City. This presentation gave those in attendance a behind the curtain view of the construction process used to build both our Classic and Legend Rifles. My host Richard Turnure, club members, invited guest and the staff at the Union Club were most gracious and made my short stay quite memorable. This institution is steeped in history and it was an honor to be there. I have given these presentations all over the country for 20 years and find these engagements very enjoyable.

The last time I was in Manhattan was in 1979 when I applied for a position at Griffin & Howe. At the end of a two day interview I was offered a job but ultimately declined the position.

I would like to thanks those that were in attendance and hope the material covered was of interest to everyone.


Photo credit thanks to Wikipedia

Friday, November 15, 2013

The 2013 Mule Deer Season So Far

This has a been a good fall for some of our clients and friends. Lighting struck twice in Utah with LB's buck taken with Bucks and Bulls, Guides and Outfitters. LB's guide was Travis Adams and on a lease they have had for years. The buck was shot just at dark as he moved out of an Aspen patch to feed. The rifle used was made by Gene Simillion and chambered for 7mm Dakota.


The second buck was also taken in Utah again with Bucks and Bull Guides and Outfitters by a client of ours from Sweden. Anders had purchased a management tag and was to help cull some older breeding bucks that would never be considered by a trophy hunter. I was Anders guide on this hunt and I may have over-shot the protocol on this buck as I never saw the crab clawed fourth on the main beam. I will likely being clearing trails and mending gates this summer as disciplinary action for the oversight.  Anders made the comment that he saw more game on the first 2 days of the hunt than he might see in 2 years of hunting in Sweden. His shot was taken at 330 yards with a Legend 300 H&H Standard Sporter.

.This third buck was taken in Alberta by Chuck Nelson on a self guided hunt. Chuck said he past up 97 or 98 bucks before he had to be talked into shooting this bruiser, talked into? This buck was taken with a Left Handed 7mm Mashburn just shy of 300 yards. Chuck assembled the Mashburn with a LH Legend Stock and the help of some better than average Gun-Smithing talent in Canada.

      Talked into indeed. 


Thursday, October 17, 2013

Professional Stockmaking, By David Wesbrook

Recently I acquired a copy of David Wesbrook's book on stockmaking. I had been aware of this book for a quite some time and had always meant to pick up a copy. Dave had one of the older copies in his possession and was kind enough to let it go. I first met Dave while on a pilgrimage to visit Fred Wells shop almost 30 years ago and we have kept in touch ever since that introduction all those years ago.

I enjoy reading right around dawn with a strong cup of coffee when the house is still quiet and the day full of possibilities. I usually read 10-20 pages and then head to the shop. I finished this book in two mornings and have since gone back and re-read a few select chapters. As a professional in the trade I found the text concise and very well written. The pictures are simply superb. If I were a budding hobbyist or journeyman the pages would be dog-eared and covered finger prints within a month.

Anyone interested in stockmaking from the casual observer or the seasoned practitioner will find this book an excellent addition to their library. Two thumbs up !!!!!!!


Wednesday, October 16, 2013

The Final Stretch, Finished With The Finish

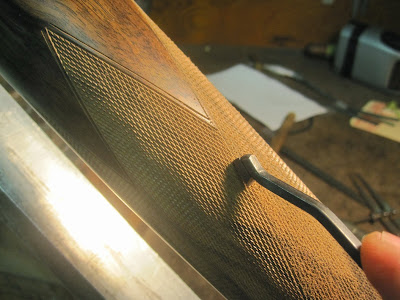
Like they say about the Fat Lady singing? The same applies with checkering as it's only talk until you apply the finish. I apply at least 4 soaking coats. Then rub the stock out one last time with finish and rotten stone. Laps time from start to finish was 52.5 hours.


Remember the previous post entitled Into The Void? Below are some pics of those same voids that fell into or on the edge of the pattern. Had these voids been filled with glass only and not carefully fit with dutchman's the voids would have likely shown up as a less than stellar repair. In the end it's all about the details on the journey.


Tuesday, October 15, 2013

The Final Stretch, Grip Layout Continued

The task of bringing all the lines to depth at the grip must be done with the same care as the forend. Additional care must be taken in the curve of the grip to keep the deepening cutter from skipping out of the groove, the length of the cutter comes into play in this area and the shorter the better. Care must also be taken to keep these lines a parallel as possible. Due to the geometry of my grips and the style of this border some additional tooling is required. There are 6 of these tools, the 2 curved and modified rifler files, 2 engraving tools and 2 dog leg tapered chisels for trimming and cutting into the V's on the borders. I like to use a 3/32" square engraving tool sharpened on an angle to allow me to cut the diamonds to depth in this tight area. I also use a # 2 curved rifler files that I have surface ground to the same approximate width of my border to smooth out my initial chisel cuts. Where the border at the rear of the grip makes a radial up-hill curve I use another 3/32'' square engraving cutter with more heel ground onto it's cutting face instead of a veiner to establish this tight corner. With the pattern cut to depth I then begin to cut in the angular border flats on both sides of the grip. Time is now spent cleaning up the borders and looking for any diamonds that are still slightly flat topped. Apply finish is right around the corner.


Monday, September 30, 2013

The Final Stretch, Grip Layout

The layout of the checkering pattern for the pistol grip of any stock for me is fraught with "what if's". With a point pattern the master line layout from one side to the other dictates the whole composition and balance of the patterns final shape. Extreme care must be taken to insure the angle of the master line triangle is positioned in the same plane on both sides of the grip. I first lay out the border at the bottom of the pattern parallel to the grip cap flat. I then lay out the border that runs between the two panels from the leading edge of the grip cap to the back of the trigger guard. This line is first drawn in with a white pencil. When I have the two borders parallel I cut both lines in with a Japanese 70 degree veiner to about 1/4 depth. Then using a compass I establish the border around the tang and the radius on either side of the trigger bow. These curve's are then cut in with the veiner. Then I try to position the intersection of the master lines so this major intersection point lays visually in the center of the grip.

I always lay out the cheek piece side first so the rear tail of my point pattern allows for the termination of the cheek piece. To do otherwise is just asking for trouble as the end of your pattern may cut into the end of your cheek piece if done from the other side first. I cut in both master lines on both sides of the grip once I am happy with the looks and position of this intersection. I do not establish any other borders but rely on the lines to be cut in eventually to determine the end or border of the pattern. Like the forend I will lightly scribe in some reference lines to keep me honest as the lines wrap around the curves of the grip. Many people comment on how "straight" the lines appear on good checkering which I find quite comical. What you see in a good pattern is well spaced parallel lines that are then following a parabolic curve in most cases, straight? Not hardly. I also place two layers of tape on the back side of the grip panel to prevent any cutters from accidentally scratching the stock behind the pattern in this tight area.

I lay out both sides of the grip and then as with the forend establish the ends of the major points so their lengths are optically pleasing. Then I cut in the borders except for the shortest borders on the leading edge of the pattern, don't ask me why I save those for last as I'm not sure I could tell you. Then starting with the 75 degrees cutter I deepen the pattern on both sides with two passes. Once this is done I begin the final deepening with a 90 degree cutter. In tight corners I use a short corner cutter or the veiner. At this stage of the process I have 42.5 solid man hours in this checkering project and I'm are not done yet.


Tuesday, September 24, 2013

The Final Stretch, Finishing Up The Forend Checkering

Once all the lines in both directions are spaced I make sure the pattern as a whole looks balanced. I will add a line to extend the tail on one of the major points if it's to short, extend one of the top border lines to match it up with the corresponding border on the opposite side. The pattern must appear to be geometrically pleasing. The final lay out must be done with thought and care so as not to create more work than is necessary. When I'm satisfied with the overall pattern I then lay out and lightly cut in the borders.

The next step is to deepen the pattern and bring the diamonds up to points. I start with a 75 degree cutter and make at least 2 passes in both directions over the entire pattern. In the corners I use a short corner cutter and a V tool. Then I make two more passes using a 90 degree single line cutter. Care must be taken to stay in the track and not plow a line out of the groove and start another unwanted line. In the words of the late Len Brownell when you come the border of the pattern you "stop"the cutter to prevent over runs. Then I use a Super Fine 90 degree finish cutter to point up the pattern and make all the grooves appear to be the same depth.

The typical Mullered border uses a radial groove that lays between the main pattern and outermost line of the border. The Border I use I shamelessly borrowed from Monte Mandarino and Monte robbed it off and early Haenel stock. For me it was love at first sight. Some call it a Window Box effect, others a Shadow box, call it what you want it's not all that hard but does take more time to execute. I cut this border in on angle that drops away from the outer edge of the border and falls towards the base level of the diamonds. This is done with a narrow razor sharp chisel, a file and a set of dog foot chisels to establish the corners or tails of the points.

With the forend finished I move to the grip.


Sunday, September 22, 2013

The Final Stretch, Forend Layout

I am always glad to start the checkering on any project as the end is in sight. While I have owned and used two different MMC electric tools over the years for the layout. I never was happy with either and returned to using standard push hand tools. The MMC didn't seem to save me anytime and at least in my hands a mistake could happen in an instant that was difficult to repair or incorporate in the pattern. Today I generally checker 24 lines per inch and have an open point pattern I use 95% of the time that has a bordered perimeter.

I start the pattern by laying out the two top lines on either side of the forend. These need to be the exact same length and in the very same position. These are laid out with wooden jig and a dog leg scribe. I  then use a 60 degree cutter to deepen these two boarders. Then using a piece of copy paper I have wrapped around the forend I mark the ends of both these freshly cut lines as accurately as possible with the paper immobile and very taught. I use this marked paper to give me the volume of the forend in the length of the pattern to be cut. I find and establish the centerline based on the forends volume and add a 3" to 1" set of master lines on this template and draw in the pattern I want to transfer to the stock. All the boarders are laid out on this paper template.

When I have the pattern exactly like I want it tape it to the stocks forend and transfer the pattern to the wood with a tiny prick punch. When the entire transfer is complete I remove the paper and using baby powder to highlight the pricked holes make sure all is well. Changing anything at this stage is very difficult so diligence and accuracy while making the paper pattern and in the transfer is very important. Using the same 60 degree cutter I cut in both master lines and begin cutting in the lines with both a 2 and a 3 line cutters that cut on the pull stroke. All the teeth are cutting teeth, I do not like the safe edge cutters. I will space 4 lines in a singular direction then reverse the stock 180 degrees and cut in 4 more lines from the opposite direction and on either side of the pattern. When I'm spacing the pattern I do so standing up otherwise I tend to allow my lines to drift if I'm sitting. I also layout lines parallel to the master lines around the forend to check from time to time to keep me in sync with the desired results. If my lines start drifting I make corrections at that time.